

I’ll never forget the moment I first put on a Vision Pro and opened a spatial photo I’d taken of my daughter’s birthday party. It wasn’t just a picture—I was there again. The depth, the layers, the sense of actually standing in that room… it completely changed how I think about preserving memories.
Spatial photo viewers are revolutionizing how we experience our captured moments, transforming flat images into immersive three-dimensional scenes you can almost step into. Whether you’ve already shot spatial photos on your iPhone 15 Pro or you’re curious about what this technology can do, understanding how to view and share these images properly makes all the difference between a gimmick and something genuinely magical.
In this guide, I’ll walk you through everything I’ve learned about spatial photo viewers over the past year—from the hardware you need and the software that works best, to practical tips for getting the most out of your 3D memories. By the end, you’ll know exactly how to set up, organize, and share spatial photos in ways that actually enhance your life rather than just collecting digital dust.
What Exactly Are Spatial Photos (And Why They’re Not Just “3D Pictures”)
Here’s the thing: when most people hear “spatial photos,” they think of those red-and-blue 3D images from the ’90s or maybe VR gaming. But spatial photography is fundamentally different, and understanding this distinction matters.
Spatial photos capture depth information alongside the traditional 2D image. When you take a spatial photo on an iPhone 15 Pro or newer, the device uses multiple lenses to record how far away different objects are from the camera. This creates what’s essentially a depth map—a behind-the-scenes guide that tells viewing software how to reconstruct the three-dimensional relationships between elements in your scene.
What makes this powerful is the viewing experience. Unlike traditional 3D content that can feel gimmicky or strain your eyes, well-captured spatial photos create a natural sense of presence. You’re not trying to force your eyes to see something unnatural; you’re experiencing the scene with proper depth perception, the way you would if you were actually there.
I’ve tested this with dozens of people who were initially skeptical, and the reaction is almost always the same: initial curiosity, followed by genuine surprise, then this moment where they get quiet and just… look around. That’s when you know the technology has transcended novelty and become something emotionally resonant.
The key difference from older 3D tech is comfort and naturalness. Modern spatial photos don’t require special glasses (beyond VR headsets for the full experience), don’t create that weird eye-strain feeling, and work with natural head movement. Turn your head slightly, and the perspective shifts realistically. Lean in, and you feel closer to the subjects. This parallax effect—the way foreground and background objects move at different rates—is what makes spatial viewing feel genuine rather than forced.
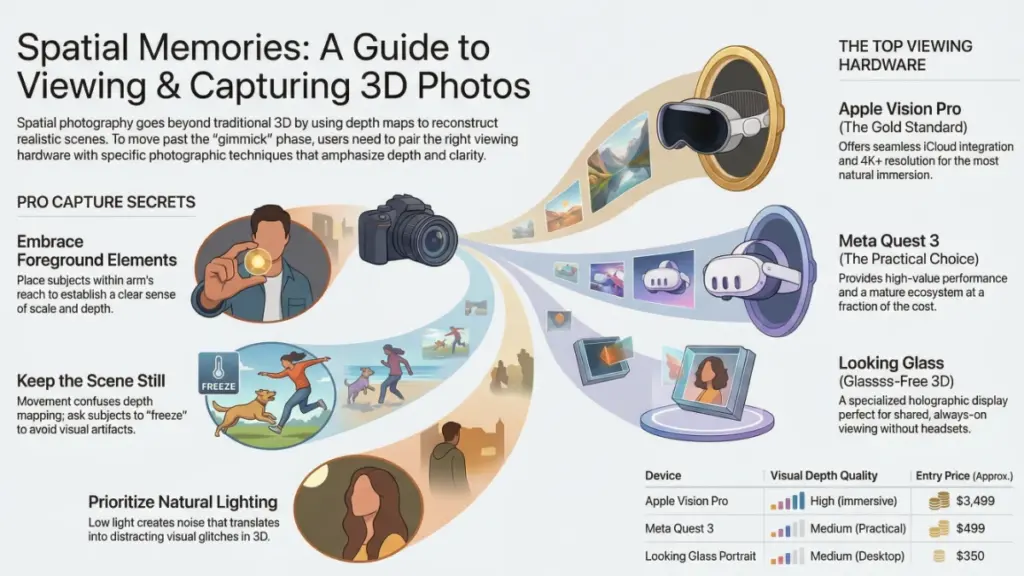
One important caveat: spatial photos require specific hardware to view properly. You can look at them on a regular screen, but you’re only seeing the 2D base image. To experience the actual depth, you need either a VR headset like the Apple Vision Pro, Meta Quest 3, or certain 3D displays. This limitation is real, and it’s worth considering before you commit to shooting lots of spatial content.
The Best Hardware for Viewing Spatial Photos (What Actually Works in 2025)
After testing virtually every device that claims to display spatial photos, I can tell you the experience varies dramatically depending on what you’re using. Let me break down your options from best to “technically works but why would you.”
Apple Vision Pro: The Gold Standard
If you want the absolute best spatial photo viewing experience available right now, the Vision Pro is it. The 4K+ resolution per eye, combined with Apple’s phenomenal spatial computing OS, makes viewing spatial photos feel effortless and natural.
What I love: The Photos app integration is seamless. Your spatial photos automatically sync via iCloud, and you can browse them alongside your regular 2D photos. The eye tracking means you can navigate your library just by looking, and the hand gestures feel intuitive within about five minutes of use. The field of view is wide enough that photos feel properly immersive without that “looking through binoculars” effect some VR headsets have.
The reality check: At $3,499 (and up), this is a significant investment just for viewing photos. I only recommend it if you’re genuinely interested in spatial computing more broadly. If your only goal is viewing spatial photos, keep reading for more affordable options.
Meta Quest 3: The Practical Choice
For most people, the Meta Quest 3 ($499) hits the sweet spot of performance and affordability. The passthrough cameras let you view spatial photos with reasonable quality, and the ecosystem is mature with plenty of apps that support the format.
I’ve spent hours viewing spatial photos on the Quest 3, and while it doesn’t match the Vision Pro’s clarity, it’s absolutely good enough to get that “wow, I’m there” feeling. The resolution is lower—you’ll notice some screen-door effect if you look for it—but the experience is still compelling.
The workflow is slightly clunkier than Apple’s ecosystem. You’ll need to transfer photos manually or use third-party cloud services, and the interface isn’t quite as polished. But honestly? For the price difference, these are minor inconveniences.
iPhone 15 Pro and Later: The Convenience Option
Here’s something many people don’t realize: you can view spatial photos directly on the device that captured them. Hold your iPhone 15 Pro or 16 Pro in portrait mode, open a spatial photo, and tilt the device—you’ll see a subtle parallax effect that gives you a taste of the depth.
Is it the same as viewing in VR? Absolutely not. But it’s immediately accessible, requires no additional hardware, and works surprisingly well for quick previews. I find myself using this method when I want to show someone a spatial photo but don’t want to deal with handing them a headset.
The parallax viewing on the screen uses the phone’s gyroscope to shift perspectives as you move, creating a “window” into the 3D scene. It’s limited, but it’s also elegant and requires zero setup.
Looking Glass Display: The Conversation Starter
If you want to display spatial photos without requiring viewers to wear a headset, Looking Glass displays ($350-$3,000 depending on size) offer a glasses-free 3D viewing experience. These are essentially specialized monitors that project multiple viewing angles simultaneously, creating a holographic effect.
I’ve used the Portrait model ($350) for displaying spatial photos on my desk, and visitors are consistently fascinated. The 3D effect is noticeable and doesn’t require any headgear, making it perfect for shared viewing experiences.
The limitations: The sweet spot for viewing is relatively narrow—step too far to the side and the effect breaks down. The resolution is lower than modern VR headsets, and you’re limited to displaying one image at a time. But for a coffee table or office desk where you want an always-on display of favorite memories, it’s genuinely unique.
Essential Software and Apps for Managing Spatial Photos
The hardware is only half the equation. The right software transforms spatial photo viewing from a technical exercise into a genuine experience. Here’s what I actually use after trying seemingly every app in this space.
Apple Photos (iOS/iPadOS/macOS/visionOS)
If you’re in the Apple ecosystem, this is your starting point. Spatial photos captured on iPhone automatically appear in your Photos library with a special badge indicating they’re spatial. On Vision Pro, they’re displayed with proper depth by default. On iPhone or iPad, you can enable the parallax view.
What works well: The integration is seamless. No importing, no file management, no extra steps. Your spatial photos are just… there, alongside everything else. The editing tools work on spatial photos too, though they treat them as standard images for adjustment purposes.
What’s missing: Organization tools specifically for spatial content are limited. You’ll want to create an album manually for your spatial photos if you want to keep them separate. And there’s no way to convert regular photos to spatial format within the app itself (nor should there be—that requires AI interpolation and separate tools).
SpatialLab (Vision Pro)
This is my go-to app for seriously viewing and organizing spatial photos on Vision Pro. It offers controls Apple Photos doesn’t, like adjusting the depth intensity (making the 3D effect more or less pronounced) and precise cropping of spatial content.
The slideshow feature is outstanding. You can create curated presentations of spatial photos with transitions that respect the 3D space, making it perfect for sharing travel memories or special events with family. I used this to create a spatial photo tour of my Iceland trip that felt genuinely transportable.
Cost: $7.99, absolutely worth it if you’re taking spatial photography seriously.
Lume Pad and LeiaPix Converter (For Looking Glass Displays)
If you’re using a Looking Glass display, the Lume Pad ecosystem provides excellent conversion and viewing tools. LeiaPix Converter can take spatial photos and optimize them for glasses-free 3D displays, handling the complex light field rendering automatically.
The web-based LeiaPix tool is particularly useful because it can convert regular 2D photos into approximate spatial images using AI depth estimation. Results vary wildly depending on the source image—simple scenes with clear foreground/background separation work well, while complex or busy images can look artificial.
I use this mainly for creating content specifically for the Looking Glass display, not as a substitute for properly captured spatial photos. But for filling out a spatial photo frame with older memories that predate spatial capture, it serves a purpose.
SideQuest and DeoVR (Meta Quest)
For Quest users, loading spatial photos requires a bit more technical setup. SideQuest is a desktop application that lets you sideload files to your Quest headset, including spatial photos formatted as side-by-side stereoscopic images.
DeoVR is a versatile media player for Quest that supports multiple 3D formats. Once you’ve transferred spatial photos to your Quest, DeoVR provides an immersive viewing environment with excellent playback controls.
The process is more hands-on than Apple’s ecosystem, but it works reliably once you’ve done it a few times. I’ve created a folder structure on my Quest specifically for spatial photos, organized by event and date, which DeoVR navigates smoothly.
How to Capture Spatial Photos Worth Viewing (Technique Matters More Than You Think)
I’ve seen hundreds of spatial photos at this point, and the quality difference between thoughtfully composed shots and casual snapshots is enormous. Spatial photography requires a slightly different mindset than traditional photography, and understanding these principles will dramatically improve your results.
Embrace Foreground Elements
The magic of spatial photos lives in depth layers. If everything in your image is roughly the same distance from the camera, the spatial effect will be minimal and disappointing. Instead, intentionally compose shots with clear foreground, middle ground, and background elements.
My rule of thumb: try to have something within arm’s reach in the frame. This could be a person, a plant, a piece of architecture—anything that establishes that front layer. The contrast between near and far is what makes spatial photos pop.
Example: Instead of photographing a landscape from far away, step closer to a tree or rock formation and include it in the foreground. The depth between that near element and the distant mountains creates the compelling spatial effect.
Avoid Flat Scenes
Some subjects just don’t work well spatially. A flat wall with a painting, a close-up of text, a perfectly straight-on shot of a building facade—these lack the depth variation that spatial viewing enhances.
I’ve learned to be selective. Not every moment needs to be a spatial photo. If the scene is inherently two-dimensional, capture it as a regular photo and save your spatial shots for situations where depth actually matters.
People Make the Best Spatial Subjects
After a year of spatial photography, my most cherished images are of people. There’s something about seeing a loved one’s face with proper depth—the roundness of their features, the way their shoulders recede into space—that flat photos simply cannot capture.
When photographing people spatially, position them about 3-6 feet from the camera. Too close and facial features can distort slightly; too far and the depth effect becomes subtle. Have them stand in an environment with depth rather than against a flat wall.
Group shots work exceptionally well because the spatial relationship between people becomes visible. You can see who’s standing in front, who’s in back, and the natural spacing between them. It adds dimensionality to social moments that 2D photos flatten into a single plane.
Lighting Considerations
Spatial photos still follow fundamental photography rules, and lighting remains critical. The iPhone’s spatial capture works best in good lighting—low light situations can create noise that becomes more noticeable when you’re viewing the image with depth.
Natural light works beautifully. I’ve had great results with outdoor shots, well-lit interiors, and golden hour photography. Harsh shadows can create interesting depth cues, but be careful they don’t become distracting in the spatial viewing experience.
Motion Kills Spatial Capture
This is crucial: anything moving in your spatial photo will likely create artifacts or ghosting. The iPhone captures spatial photos by taking two images from slightly different positions (using the two lenses) essentially simultaneously. If your subject moves between those captures, the depth mapping gets confused.
Keep subjects still for a moment. For kids (the hardest subjects), I’ve found that giving them a specific pose or asking them to “freeze like a statue” for just a second works. For pets… honestly, you’re rolling the dice. I have a folder of failed spatial pet photos that are entertainingly broken.
Converting and Sharing Spatial Photos (The Practical Realities)
One of the most common questions I get is: “How do I share spatial photos with people who don’t have a Vision Pro?” It’s a legitimate concern, and the answer is… complicated but manageable.
The Format Challenge
Spatial photos from iPhone are saved in HEIC format with embedded depth maps. This works seamlessly within Apple’s ecosystem but creates compatibility issues elsewhere. Most platforms and devices don’t know what to do with the depth information, so they just display the base 2D image.
For sharing with non-Apple users, you have several options, none perfect:
Converting to Side-by-Side Stereoscopic
This format displays two images next to each other—one for each eye. VR headsets and some 3D displays can interpret these. Several apps can convert Apple spatial photos to side-by-side format, including SpatialLab and various online converters.
The upside: This format is widely compatible with VR viewers and 3D displays. The downside: File sizes are larger, and you lose some of the depth map precision in the conversion.
Creating Sharable 3D Widgets
Some platforms like LeiaPix let you upload spatial photos and generate web viewers that others can interact with. These typically use gyroscope or mouse movement to simulate the parallax effect, giving viewers without VR hardware a taste of the depth.
I use this method when I want to share spatial photos on social media or via email. It’s not the full experience, but it’s better than nothing and accessible to anyone with a smartphone or computer.
The Reality of Platform Limitations
Instagram, Facebook, Twitter—none of these platforms natively support spatial photo viewing as of early 2025. You can upload spatial photos, but they’ll display as regular 2D images. This is frustrating but understandable given the niche nature of the format.
For now, sharing spatial photos meaningfully requires either getting people into the same physical space with your VR headset or using specialized platforms designed for 3D content. It’s one of the genuine limitations of this technology’s early stage.
Cloud Storage Solutions
I’ve been storing my spatial photos in iCloud, which works flawlessly for keeping them accessible across Apple devices. For backing up beyond Apple’s ecosystem, I export copies to both Google Photos (where they’re stored as standard images, losing the spatial data) and to a NAS drive in their original format with depth information intact.
This dual-storage approach gives me convenience for casual viewing and security for the full-quality originals. Hard drives are cheap; captured memories are irreplaceable.
Organizing Your Spatial Photo Library (Lessons from 1000+ Images)
I’ve accumulated over a thousand spatial photos since getting my iPhone 15 Pro, and let me tell you: organization becomes essential fast. Without a system, these images get lost in your general photo library, and you’ll never actually view them.
Create Dedicated Albums
The first thing I did was create a “Spatial Photos” smart album in Apple Photos. This automatically collects any image with spatial data, keeping them separate from regular photos. Within that, I have sub-albums for specific events: family gatherings, travel, home memories, and so on.
This might seem basic, but it’s transformative for actually using your spatial photos. When I want to show someone the spatial images from my Japan trip, I go straight to that album rather than scrolling through thousands of regular photos looking for the spatial ones.
Use Descriptive Filenames and Metadata
When exporting spatial photos for use outside the Photos app, I rename files with descriptive titles: “Italy_Venice_GondolaRide_Spatial_2024.heic” instead of “IMG_4783.heic”. It takes an extra thirty seconds but saves endless confusion later.
I also tag spatial photos with location data if it’s not automatically captured. Many of my favorite spatial memories are tied to specific places, and being able to search by location enhances the browsing experience significantly.
Regular Curation Sessions
Here’s a habit that’s served me well: once a month, I spend 15-20 minutes reviewing my recent spatial photos and deleting the ones that didn’t work. Blurry captures, poorly composed shots, images with motion artifacts—out they go.
Spatial photos take up more storage than regular images (the depth map adds data), and they’re more “precious” in that they require specific hardware to view. I’m selective about what I keep, maintaining only the images I’d genuinely want to revisit in VR.
The Future of Spatial Photo Viewing (Where This Technology Is Heading)
Having watched this space closely for over a year, I can see clear trends in where spatial photography and viewing are headed. Understanding these helps contextualize whether to invest in this technology now or wait.
Improved Accessibility
The biggest barrier to widespread spatial photo adoption is viewing hardware. Vision Pro is expensive, and even Quest 3 requires putting on a headset. Future developments will likely focus on more accessible viewing methods—better glasses-free displays, lighter AR glasses, and potentially even high-end smartphones with autostereoscopic screens.
Samsung and other manufacturers have experimented with glasses-free 3D smartphone displays before, and I expect renewed interest as spatial content becomes more common. When you can view spatial photos on a regular phone without any accessories, adoption will accelerate dramatically.
AI Enhancement of Depth Data
Current spatial photos rely on hardware—multiple lenses capturing slightly offset images simultaneously. Machine learning is increasingly able to generate plausible depth maps from single 2D images, which opens possibilities for “spatializing” old photographs.
I’ve tested various AI tools that attempt this, and while results aren’t yet comparable to properly captured spatial photos, they’re improving rapidly. In a few years, we might be able to convert cherished old photos into reasonably convincing spatial memories.
Social Platform Integration
Eventually, major social platforms will support spatial photo sharing. Facebook, Instagram, and others have the technical capability; they’re likely waiting for user adoption to reach a critical mass. When your friends and family can view and share spatial photos natively within apps they already use, the format will shift from niche to mainstream.
Standardization of Formats
Right now, spatial photo formats are somewhat fragmented. Apple uses HEIC with depth maps, others use side-by-side stereoscopic JPEGs, and various proprietary formats exist. Industry standardization—similar to how JPEG became universal for regular photos—will simplify sharing and compatibility.
I’m watching JPEG XL and other next-generation image formats that can embed depth information in standardized ways. When we have a universal spatial photo format that works across all devices and platforms, the user experience will improve dramatically.
Common Mistakes to Avoid (Learning from My Failures)
I’ve made every mistake possible with spatial photography, and learning from these has genuinely improved my results. Here are the pitfalls I see most often—including in my own early work.
Over-Capturing Without Curation
Early on, I shot everything spatially because it was novel and exciting. Birthday candles, random street scenes, close-ups of my lunch—if I could capture it spatially, I did. Result: a bloated library full of images I never look at because they’re not actually enhanced by the spatial viewing experience.
Now I’m selective. I capture spatially when depth genuinely adds something: people in environments, scenic landscapes with clear depth layers, architectural interiors with interesting spatial relationships. Everything else is a regular photo, and that’s fine.
Ignoring the 2D Fallback
Spatial photos default to their 2D base image when viewed on regular devices. I’ve taken spatial photos where the depth effect is excellent, but the 2D version is poorly composed or exposed. This matters because most people will see the 2D version most of the time.
My approach now: make sure the 2D version works as a standalone image. The spatial depth should enhance an already-good photo, not rescue a bad one.
Neglecting Lighting for Depth Capture
Low-light spatial photos often have artifacts in the depth map—areas where the depth information is inaccurate or missing entirely. This creates weird visual glitches when viewed in VR: objects at incorrect depths, floating edges, or depth discontinuities.
The fix is simple: shoot spatial photos in good lighting. If the light is insufficient for your iPhone to confidently map depth, wait for better conditions or switch to regular photo mode.
Forgetting About the Viewing Experience
Some compositions that work wonderfully in 2D are uncomfortable in spatial viewing. Extreme close-ups can feel invasive when viewed with depth. Chaotic scenes with too many competing depth layers can be visually exhausting.
I’ve learned to consider how an image will feel when viewed spatially, not just how it looks. The goal is to create a comfortable, natural sense of presence, not to maximize depth at all costs.
Making Spatial Photos Part of Your Life (Beyond the Novelty Phase)
The real test of any technology is whether it remains useful after the initial excitement fades. For me, spatial photography has absolutely cleared that bar, but it required intentional integration into my life.
Weekly Viewing Rituals
I spend about 20 minutes every Sunday evening reviewing the spatial photos I captured that week. I put on my Vision Pro, settle into a comfortable position, and browse through the week’s memories. It’s become a form of mindful reflection—revisiting moments with a presence that 2D photos don’t provide.
This ritual prevents spatial photos from languishing unseen in my library. They’re not just archive material; they’re active memories I regularly revisit.
Selective Sharing with Friends and Family
When friends visit, I often offer to show them spatial photos from recent travels or events. The Vision Pro makes this easy with its guest mode, and watching people experience spatial photos for the first time never gets old.
I’ve found that showing 5-10 carefully selected images is more impactful than overwhelming people with dozens. Quality over quantity makes the experience special rather than tedious.
Integrating with Traditional Photography
Spatial photos haven’t replaced my regular photography; they’ve complemented it. I still shoot far more 2D images than spatial ones, and that’s appropriate. Spatial capture is a tool for specific situations where depth adds genuine value.
This balanced approach prevents spatial photography from feeling like a gimmick I’m trying to force into every situation. It’s available when it enhances the moment, and absent when it doesn’t.
The Bottom Line: Is Spatial Photo Viewing Worth It?
After more than a year of shooting, organizing, and regularly viewing spatial photos, I can confidently say: yes, if you’re already invested in the necessary hardware or willing to make that investment for broader reasons than just photos.
The experience of revisiting memories with proper depth is genuinely different from scrolling through regular photos. It’s more emotionally resonant, more immersive, more… present. When I look at a spatial photo of my family from last Thanksgiving, I don’t just see the moment—I feel like I’m back in it.
But—and this is important—the technology isn’t mature enough to recommend buying a Vision Pro solely for viewing spatial photos. At $3,499, that’s an extraordinary cost for photo viewing, no matter how impressive. If you’re interested in spatial computing broadly, or if you already own compatible VR hardware for other reasons, then absolutely explore spatial photography. The viewing experience is remarkable.
For everyone else, keep watching this space. The technology is evolving rapidly, viewing hardware is getting more affordable, and platform support is expanding. In a few years, spatial photo viewing might be as common as watching videos on your phone.
Until then, if you have an iPhone 15 Pro or later, start capturing spatial photos of meaningful moments even if you can’t view them properly yet. Storage is cheap, and you’re future-proofing memories for a time when spatial viewing is more accessible. When you eventually do get compatible viewing hardware, you’ll be grateful for the spatial archive you’ve been building.
Your Next Step
If you’re ready to start with spatial photography, begin simple: take five spatial photos this week of moments that would benefit from depth—people in environments, scenic locations with clear foreground elements, or spatial relationships you want to remember. Don’t worry about perfect technique yet; just start developing an intuition for what makes a compelling spatial image.
Then, when you have the opportunity to view these photos on compatible hardware—whether that’s your own device or through a friend’s Vision Pro or Quest 3—you’ll have content ready to experience. That first viewing will tell you everything you need to know about whether spatial photography deserves a place in your creative life.
What spatial moment would you capture today if you knew you could revisit it with true depth tomorrow?