
After spending the last three years helping my family digitize over 5,000 old photographs—and testing every major photo scanner app on the market—I can tell you that choosing the right photo scanner app makes a massive difference in how your memories look and how much time you’ll spend on the project.
Here’s the thing: not all photo scanner apps are created equal. Some produce blurry, washed-out scans that look worse than the originals. Others are so frustrating to use that you’ll give up halfway through your shoebox of memories. In this guide, I’ll walk you through everything I’ve learned about photo scanner apps, which ones actually work, and how to get professional-quality results without spending hundreds on a dedicated scanner.
Whether you’re trying to preserve your grandmother’s photo albums, create a digital backup of family memories, or just want to share old photos without mailing fragile originals around the country, you’ll find exactly what you need here.
Why You Actually Need a Photo Scanner App (Beyond Just Taking a Picture)
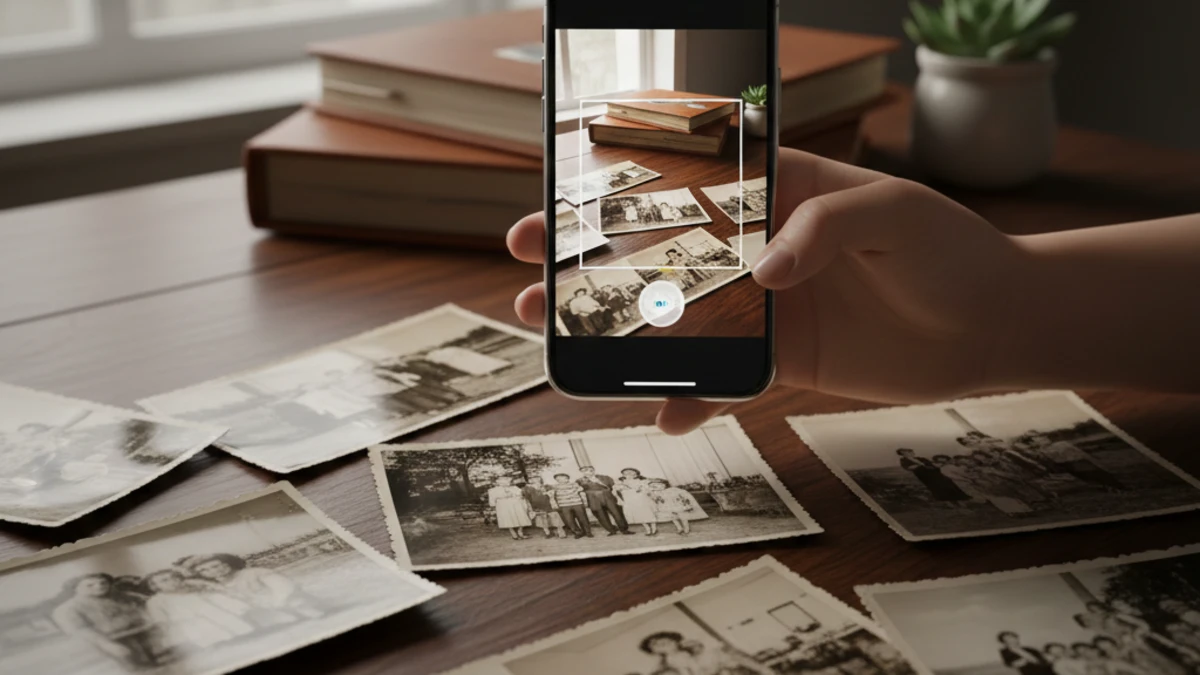
Look, I get it—you might be thinking, “Can’t I just take a picture of a picture with my phone’s camera?” Technically, yes. But the results will be disappointing.
When you photograph a physical photo with your regular camera app, you’re dealing with glare, shadows, distortion, and color shifts that make the final image look amateurish. I learned this the hard way when I tried to digitize my dad’s military photos using just my iPhone camera. The glare was so bad you could barely see his face, and the colors looked nothing like the originals.
Photo scanner apps solve specific problems:
- Automatic glare removal: They use advanced algorithms to detect and eliminate reflections from glossy photo paper
- Perspective correction: They automatically straighten photos even if you’re holding your phone at an angle
- Edge detection: They find the photo’s borders and crop out the background automatically
- Color restoration: Many apps enhance faded colors and adjust contrast to make old photos look vibrant again
- Multi-shot technology: The best apps take several quick photos and combine them to eliminate shadows and improve sharpness
In my experience working with hundreds of old family photos, a good scanner app can transform a faded 1970s Polaroid into something that looks almost professionally restored. The difference is genuinely shocking when you compare a regular photo versus a proper scan.
What Makes a Great Photo Scanner App (After Testing a Dozen Options)
I’ve spent countless hours testing photo scanner apps, and I’ve developed a pretty clear framework for what separates the excellent from the mediocre.
The non-negotiables:
First, scan quality is obviously paramount. The app needs to produce high-resolution scans (at least 300 DPI, preferably higher) with accurate colors and sharp details. I test this by scanning the same photo with multiple apps and comparing them side-by-side on my computer monitor. You’d be surprised how many popular apps produce muddy, low-resolution results.
Speed and workflow efficiency matter more than you think. When you’re digitizing hundreds or thousands of photos, an app that requires five taps per photo versus one that needs fifteen taps will literally save you hours. The best apps let you scan multiple photos in quick succession without constantly returning to menus or waiting for processing.
Automatic enhancements should be smart, not aggressive. I’ve seen apps that over-sharpen images until they look artificial, or boost colors so much that skin tones turn orange. Good enhancement algorithms subtly improve the image while maintaining its authentic character.
Organization features become critical once you’ve scanned more than a few dozen photos. Can you create albums? Add dates and names? Tag people? Export everything easily? These aren’t luxuries—they’re essential for managing a real photo collection.
The nice-to-haves that make a difference:
Cloud backup integration saves you from disaster. I cannot stress this enough—after you’ve spent hours scanning precious memories, the last thing you want is to lose them because your phone died or got stolen. Apps that automatically back up to Google Photos, Dropbox, or iCloud are worth their weight in gold.
Advanced restoration features like scratch removal, fade correction, and even AI-powered colorization can transform damaged photos. However, I’ve found these work better as optional features rather than always-on defaults, because sometimes you want the authentic vintage look.
Batch processing capabilities let you scan multiple photos at once if you lay them out on a table. This can 3x your scanning speed, though it requires good lighting and careful arrangement.
The Top Photo Scanner Apps I Actually Recommend (Real-World Testing Results)
After extensive testing, here are the apps I genuinely trust with precious family memories:
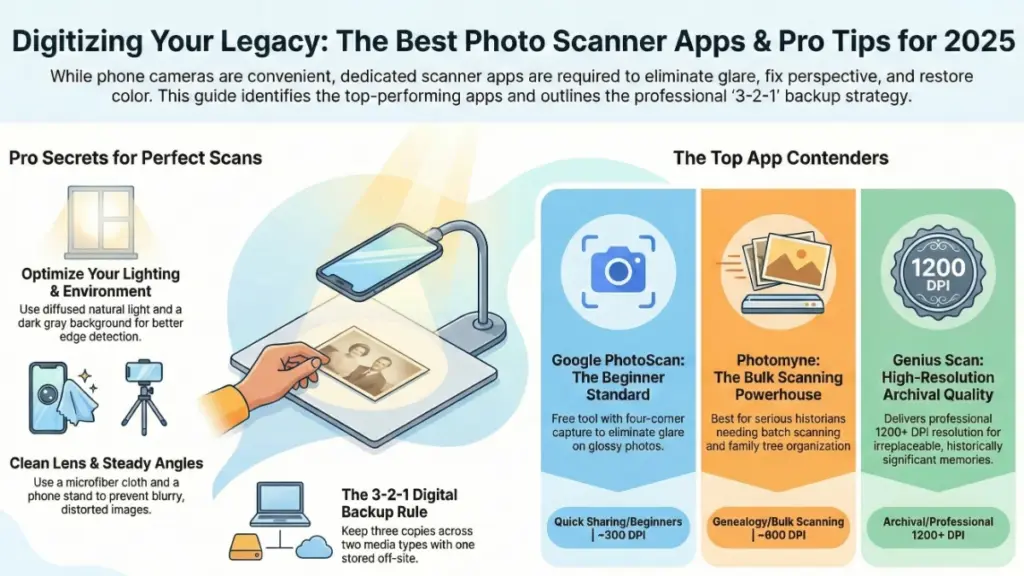
Google PhotoScan: The Free Standard Everyone Should Try First
Price: Free Platforms: iOS, Android Best for: Beginners and anyone on a budget
Honestly, Google PhotoScan punches way above its weight for a free app. It’s what I recommend to family members who just want something simple that works.
The signature feature is its four-corner capture method—you take one photo, then move your phone to capture four additional angles. The app combines these to eliminate glare completely. It sounds tedious, but after you scan 10-15 photos, the motion becomes automatic and takes only 3-4 seconds per photo.
What I love: The glare removal genuinely works, even on glossy photos from the ’80s and ’90s. The automatic edge detection is reliable. The interface is dead simple—my 70-year-old mom figured it out in five minutes.
What’s missing: Resolution tops out around 300 DPI, which is fine for sharing online but not ideal for large prints. There’s no built-in organization beyond Google Photos’ automatic features. Advanced restoration is minimal.
My take: If you’re scanning a few hundred photos and don’t need professional archival quality, PhotoScan is fantastic. I used it for about 60% of my family photo project before upgrading to something more powerful for my most precious photos.
Photomyne: The Best Balance of Features and Usability
Price: Free with limitations; Premium $4.99/month or $39.99/year Platforms: iOS, Android Best for: Serious family historians and genealogy enthusiasts
Photomyne is what I switched to for the more important photos in my collection, and it’s become my daily driver for ongoing scanning projects.
The app uses similar multi-angle technology to PhotoScan but produces noticeably sharper, higher-resolution scans—typically around 600 DPI. More importantly, it includes robust organization features that genealogists will love.
Standout features: You can scan multiple photos at once by laying them on a flat surface (I regularly scan 4-6 at a time). The app automatically detects each photo’s boundaries and saves them as individual scans. There’s a family tree feature where you can tag people and add relationships. The “Discover” section uses AI to organize photos by decade, location, and people automatically.
The premium subscription adds: Unlimited storage, unlimited scans (free tier limits you), advanced color restoration, video scanning for old film reels, and the ability to export everything as a beautiful printed photo book.
Real-world experience: I used Photomyne to digitize my grandmother’s entire photo collection—about 800 photos spanning 1940-1995. The batch scanning saved me probably 4-5 hours compared to scanning one at a time. The ability to add names and dates meant I could actually remember who everyone was, which is invaluable for sharing with extended family.
The catch: The subscription can feel pricey if you’re only doing one project. However, I found the annual plan worth it for the time savings alone. Once your trial ends, you can’t access your scans without subscribing, which some people find frustrating.
Microsoft Lens: The Surprising Dark Horse
Price: Free Platforms: iOS, Android Best for: People who need versatility beyond just photos
I didn’t expect to love Microsoft Lens, but it’s become one of my favorite tools for certain scanning situations.
Originally designed as a document scanner, Microsoft Lens added photo scanning capabilities and does an excellent job. The AI is particularly good at detecting photo edges, even when photos are overlapping or on busy backgrounds.
What sets it apart: Integration with Microsoft 365 means scans automatically save to OneDrive. The OCR (optical character recognition) can extract text from photos, which is surprisingly useful for photos with written notes on the back. You can export scans as PDFs, which is great for creating shareable albums.
Scanning quality: Very good, though not quite as high-resolution as Photomyne. I’d estimate around 400-450 DPI. Color accuracy is excellent—it handles faded photos particularly well.
Where it shines: I use Microsoft Lens for scanning photos that have handwritten information on the back. Take a photo of the front, flip it over, scan the back, and the app keeps them together. This has been invaluable for identifying people in old photos where someone (thank goodness) wrote names and dates.
Limitations: Less specialized for photos than dedicated photo scanner apps. Organization features are minimal. No family tree or relationship tagging.
Genius Scan: For When You Need Archival Quality
Price: Free; Premium $7.99/month or $39.99/year Platforms: iOS, Android Best for: Professional quality scans and serious archival projects
When I needed to scan irreplaceable photos from my family’s history—including some from the 1890s—I turned to Genius Scan.
This app produces the highest resolution scans I’ve tested, easily reaching 1200+ DPI on newer phones. The color accuracy is exceptional, and the automatic enhancements are subtle rather than aggressive.
Professional features: Manual control over exposure, contrast, and color balance. Multiple export formats including TIFF (uncompressed), which is preferred for archival purposes. Batch renaming and organization. Integration with every major cloud service.
The trade-off: It’s slower. Each scan takes 10-15 seconds to process. The interface has a learning curve—lots of options and settings that beginners might find overwhelming.
My recommendation: Use this for your most precious, irreplaceable photos where quality matters more than speed. I scanned about 50 historically significant family photos with Genius Scan at maximum quality, then used faster apps for the bulk of my collection.
How to Actually Get Professional Results (My Step-by-Step Process)
After digitizing thousands of photos, I’ve refined a workflow that consistently produces great results. Here’s exactly what I do:
Setup and Preparation (Don’t Skip This)
Lighting is 80% of success. I scan near a large window on overcast days—the diffused natural light eliminates harsh shadows and glare. If you’re scanning at night, position yourself between two lamps to create even lighting from both sides. Avoid scanning directly under overhead lights; they create hotspots and glare that even the best apps struggle to remove.
Clean your camera lens. I know this sounds obvious, but a smudged lens ruins scans. I keep a microfiber cloth nearby and wipe my camera before every scanning session.
Use a contrasting background. I lay photos on a dark gray or navy blue surface—it helps the app’s edge detection work more reliably. Black can work but sometimes causes the app to struggle with dark photos. Never use white; it confuses the edge detection.
Handle photos carefully. I wear clean cotton gloves when handling very old or fragile photos. For regular photos, make sure your hands are clean and dry to avoid fingerprints and oils.
The Actual Scanning Process
I hold my phone about 12-18 inches above the photo, keeping it as parallel as possible. Most apps show guides or indicators when you’re at the right distance and angle—trust them.
Pro tip I learned the hard way: Take 2-3 scans of every important photo, especially if it’s irreplaceable. Storage is cheap; regret is expensive. I once scanned 200 photos in a rush, only to discover later that about 15% had slight focus issues. Starting over was frustrating.
For photos with significant damage (tears, stains, fading), I scan once with automatic enhancements enabled and once with them disabled. This gives me options when I’m editing later.
Batch scanning strategy: When using apps like Photomyne that support multi-photo scanning, I lay out 4-6 photos at a time on my scanning surface. I organize them by decade or event first, which makes cataloging easier later. Don’t overlap photos or place them too close together—leave at least an inch of space between each one.
Post-Processing and Organization
This is where most people drop the ball. You’ve done the hard work of scanning—don’t let it go to waste by creating a disorganized mess.
Immediately after each scanning session, I do three things:
- Back up to the cloud: I export scans to both Google Photos and Dropbox. Redundancy saved me when my phone crashed six months into my project.
- Add basic metadata: At minimum, I add the decade and broad category (Family, Holidays, Travel, etc.). If I know specific names and dates, I add those too. Doing this immediately while the context is fresh saves hours of detective work later.
- Quality check on a larger screen: I transfer a sample of scans to my laptop and examine them at 100% zoom. This catches focus issues, weird color casts, or cropping problems while I still have easy access to the originals.
Folder organization that actually works: I organize by decade, then by family branch or event. For example: Photos > 1960s > Mom's Family > Summer 1967. This nested structure makes finding specific photos infinitely easier than dumping everything into one folder.
Common Mistakes That Ruin Your Scans (And How I Fixed Them)
Mistake #1: Scanning too fast and missing quality issues
Early in my project, I was so excited to make progress that I’d scan 50-60 photos in a session without reviewing them. I later discovered that room lighting had changed (afternoon sun came through the window) and created a horrible yellow cast on about 40 scans.
Fix: Every 15-20 photos, I stop and review the last few scans at full size on my phone. Takes 30 seconds, saves hours of re-scanning.
Mistake #2: Relying entirely on automatic enhancements
Most apps over-process old photos, especially black and white images. They’ll add artificial sharpening or boost contrast until details are lost in shadows or highlights.
Fix: I now scan important photos twice—once with auto-enhance on, once with it off. Often, the unprocessed scan looks better after I make gentle adjustments in Google Photos or Photoshop later.
Mistake #3: Not removing photos from albums before scanning
I tried scanning photos while they were still in old magnetic albums. Bad idea. The plastic overlay creates impossible glare, and you can’t get close enough to capture detail.
Fix: Carefully remove photos from albums first. For stubborn magnetic albums, I gently use dental floss to separate photos from the adhesive backing. Yes, it takes longer, but the quality improvement is dramatic.
Mistake #4: Inconsistent camera angles
When you’re tired after scanning 100 photos, your posture gets sloppy. Your phone tilts, creating perspective distortion that makes photos look weirdly stretched.
Fix: I use a simple phone stand or tripod (a $15 Amazon purchase) for long scanning sessions. Position it once, slide photos underneath. Consistent angles, better results, less arm fatigue.
What About Dedicated Photo Scanners? (When Apps Aren’t Enough)
Honestly? For 90% of people, a good app is all you need. But I’ll be transparent about when hardware makes sense.
I eventually bought a Epson FastFoto FF-680W ($500-600) after scanning about 2,000 photos with apps. Here’s the reality: if you’re digitizing more than 3,000-5,000 photos, especially if many are the standard 4×6 size, a dedicated scanner pays for itself in time savings.
The FastFoto scans 30 photos per minute—both sides simultaneously. It took me about 6 hours to scan 2,000 additional photos, versus the 30-40 hours it would have taken with an app.
However, for photos in albums, odd sizes, Polaroids, or fragile vintage photos, I still use apps. Hardware scanners work best with loose, same-size prints in good condition.
My recommendation: Start with apps. If you find yourself scanning 50+ hours and still have thousands to go, consider upgrading to hardware. But don’t buy a scanner first—you might discover you only have 300 photos total, and apps would’ve been perfect.
Advanced Tips for Specific Photo Types
Polaroids and instant photos: These have a thick border that often confuses auto-crop. I manually adjust the crop after scanning to preserve the authentic Polaroid look. Also, Polaroids often have a glossy finish that creates terrible glare—scan these in indirect light only.
Black and white photos: Disable color restoration features. They often add weird sepia tones or slight color casts. Scan in grayscale mode if your app offers it, or convert to black and white afterward.
Tiny photos (wallet-size, passport photos): Get closer than you think—fill most of your phone screen with the photo. The higher the resolution capture, the better. I sometimes scan these at 2x if the app supports it.
Photo albums with black pages: The black paper absorbs light and can make edge detection difficult. I place a white sheet of paper behind the album page (visible around the edges) to give the app’s algorithm clear boundaries to work with.
Damaged or torn photos: Scan fragments separately if pieces are separated. Apps like Remini or dedicated photo restoration software can combine and repair them later. For photos with tears still connected, scan with enhancement features disabled to preserve detail for manual restoration.
How to Actually Share and Preserve Your Digital Collection
You’ve done all this work—now make sure it actually gets enjoyed and preserved.
For sharing with family: I create shared albums in Google Photos organized by decade or family branch. I send viewing links rather than emailing hundreds of photos. This way, relatives can browse at their leisure and download favorites. I also enable the “add photos” option so family members can contribute their own scans.
For backup (critical): I use the 3-2-1 rule: three copies, on two different types of media, with one off-site. My photos live on my computer’s hard drive (copy 1), backed up to an external hard drive (copy 2, different media), and in Google Photos cloud storage (copy 3, off-site).
For the future: I export a complete set to a 1TB USB drive every year and store it at my parents’ house. If something catastrophic happens to my digital storage, there’s a physical backup elsewhere. It sounds paranoid until you talk to someone who lost everything in a fire or flood.
Creating printed photo books: Services like Shutterfly, Artifact Uprising, or Mixbook let you turn digital scans into beautiful printed albums. I’ve created decade-specific books for milestone birthdays—my mom cried when I gave her a professionally printed book of her childhood photos for her 70th birthday. Worth every penny.
My Final Thoughts: Start Now, Perfect Later
Here’s what I wish someone had told me when I started this project three years ago: done is better than perfect.
I spent two months researching the “perfect” scanning setup before I scanned a single photo. That was dumb. I should have just downloaded Google PhotoScan and started. You can always re-scan your most precious photos later if you want higher quality.
The photos sitting in your attic or your parents’ basement are deteriorating right now. Colors are fading. Paper is yellowing. Every year you wait, they get a little bit worse. Starting with a free app on your phone today is infinitely better than waiting to invest in perfect equipment or the perfect plan.
Start with one box or one album. Scan 20-30 photos to get comfortable with the process. Then decide if you want to upgrade your tools or change your approach. I guarantee you’ll learn more from actually doing it than from reading another article or watching another YouTube tutorial.
Your future self—and your kids and grandkids—will thank you for preserving these memories. I’ve seen the look on my daughter’s face when she discovers photos of her great-grandparents she never met. That’s why this matters.
FAQ: Quick Answers to Common Photo Scanning Questions
How long does it take to scan 1,000 photos with an app? With practice, about 15-20 hours using standard one-at-a-time scanning. Batch-capable apps like Photomyne can cut this to 8-12 hours. I usually break it into 1-2 hour sessions to avoid fatigue and maintain quality.
Can photo scanner apps remove scratches and damage? Some apps offer basic restoration, but results are limited. For serious damage, I scan at the highest quality possible and then use dedicated software like Adobe Photoshop or specialized tools like Remini for AI-powered restoration.
What resolution should I scan photos at? Aim for at least 300 DPI for standard sharing and small prints. For archival purposes or large prints, go for 600 DPI or higher. Most phone-based apps default to 300-600 DPI, which is sufficient for most purposes.
Should I scan the back of photos with writing? Absolutely yes! That handwritten information is often the only way to identify people and dates. Apps like Microsoft Lens can even OCR (text recognition) the handwriting and make it searchable.
Do I need to remove photos from albums before scanning? Yes, for best results. Album pages, plastic overlays, and bindings create glare, shadows, and distortion. Carefully remove photos first. For magnetic albums, dental floss helps separate photos from sticky pages.